Imagine you're working on the project and you have access to only CSS files you cannot add any HTML elements whatsoever. This could be the case while working on bigger projects where some code is dynamically generated and you just need to tweak some styling using CSS.
Pseudo Elements are the dummy elements that do not exist inside DOM but it provides a way to add a nonexistent element and style them, around the selected element. There are two ways Pseudo-elements can appear in the document that is :after (::after) and :before (::before)
Its name clarifies at which place it can be used. CSS before places itself before everything else in the selector and CSS after places itself after everything else in the element. Meaning, before is the first element of the selector and after would be the last element inside the selector. Pseudo-elements can be used with non-self-closing tags.
Its CSS can simply be applied using a rule using: or :: ( New Browsers supports :: )
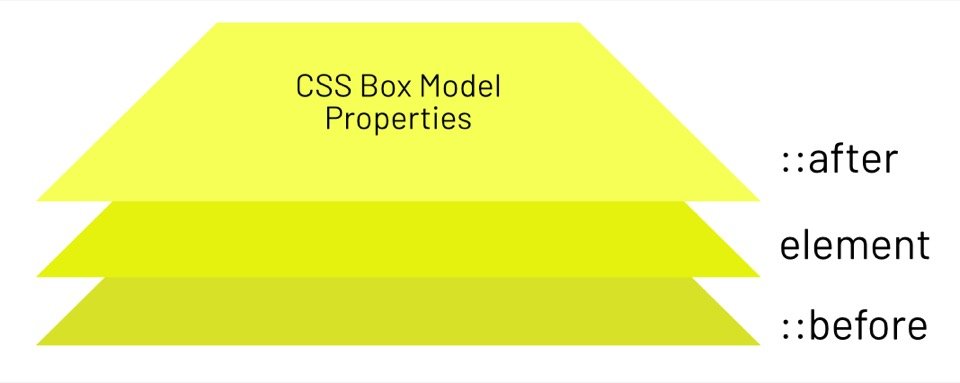
Using these simple pseudo elements we can add 2 more layers of styling to the selected HTML DOM element. The outcome that we can get with using these elements can be seen below.
CLICK ANYWHERE IN WINDOW
Basic Syntax Of CSS Before and After
The syntax is really simple. Use it after the selector and add at least a content attribute to it.
/* CSS3 */

div::before{content:'';}

div::after{content:'';}

/* CSS2 */

div:before{content:'';}

div:after{content:'';}
What is Content in CSS?
Content property generates content during rendering. The generated content is not part of DOM.
Once the content attribute is added, the element will appear. This can be inspected by a chrome inspector.

This is not about it. Content property can take some other values than just a blank.
The accepted values are:
content: normal|none|counter|attr|string|open-quote|close-quote|no-open-quote|no-close-quote|url|initial|inherit;
- normal: Default value (none)
- none: Element doesn't appear.
- counter: Can show increments of number
- attr: Displays the value of any HTML attribute.
- string: any string or unicode values and symbols.
- open-quote|close-quote|no-open-quote|no-close-quote: Displays default quote symbol / removes quote symbol.
- url: Loads image URL to display image.
CSS ::before example:
We'll use the same syntax explained above and combine some other css classes to show some more practical examples of before.
.parent{ position:relative}

.parent::before{content:'2605';}
HTML:
<div class="parent">Some text</div>

<div class="parent">Some text with before star character</div>

<div class="parent">Some More CSS only Star Shapes</div>
Here is what we have with just 2 lines of code.
This simple CSS code snippet along with HTML will give us acceptable star bullets. Using some more additional CSS we can make it better.
.parent{ position:relative}

.parent::before{content:'2605'; position:relative; padding-right:10px; color:orange; font-size:18px; }
The same example with added CSS Code.
CSS ::after example:
For sake of simplicity, I am just going o swap ::before with ::after for our next example:
.parent{ position:relative}

.parent::after{content:'2605'; position:relative; padding-right:10px; color:orange; font-size:18px; }
HTML will stay the same:
<div class="parent">Some text</div>

<div class="parent">Some text with after star character</div>

<div class="parent">Some More CSS only Star Shapes</div>
Here is what we have with if we switch before with after.
Hope this star placement explains everything about before and after in CSS. With the same concept, we can use these pseudo-elements to create greater designs.
There are some Advantages and Disadvantages of using CSS before and after.
- Performance is Better in Transitions and animations
- Easier to implement just using CSS
- Can display combined CSS of two elements
- Accessibility problem due to not being a DOM element
- Only one (of each type) allowed per element
- Not supported in old browsers
Why Use CSS before and after?
If you don't want to modify HTML code, and some level of fine-tuning to your design, you can add CSS before and after to insert dummy element pseudo-element on the main selector and combine the CSS.
Some of the practical practices used in the industry right now:
Titles: Adding decorations to Heading elements. Just by using pseudo-elements, we can draw a line or 2 lines, create gradient backgrounds, etc.
Bulleted Lists and Arrows: Adding Unicode bullets is way simpler using pseudo-elements. HTML ordered list and ordered list can have little facelift using the CSS before element.
Clear: Clearing floats is a major thing in float-based layout. pseudo-elements are clearfix's best friend. using clearfix class is the easiest way to clear class till date.
Quotes: Can easily add quote symbols to the blockquote element or any element in general so content creators can just use standard blockquote syntax and the quote icon will appear without using any image.
External Links: Many sites use custom animated underlines to show external links. This is used on many sites to create engaging anchor texts.
Icons: Many font based icon libraries use pseudo-elements to display fonts. FontAwesome, Fontello uses these techniques in their library.
Forms: Most input fields can't have pesudo elements. But required asterisks * can be done with CSS after element. Checkboxes and Radio Buttons can have custom designs just with some divs and CSS.
Image Overlays or Patterns: Most commonly used hero image with text on top uses the pseudo-element to add dark / light overlays so text can be readable on any image.
Shapes: Some simple shares like a triangle, Circle, Rectangle can be drawn using these elements. Combine those basic shares together can you can create different designs.
Tooltips: If the default title tooltip is not good enough, there are plugins that use custom tooltip and data attributes to show custom tooltips using pseudo-element.
Here is one for all example of usage:
The above example demonstrates some of the common usages of CSS after and before pseudo-elements.
In My Demo : Flash Warning
I used one span element and css before and after elements to recreate the trending Flash Warning Effect using CSS.

To summarise, I have used an image and overlayed a span on top of the image. I am using animation keyframes to change transparency and background positions on pseudo-elements.
On clicking on the document, I am adding one class called flash to the body and it triggers Flash Animation. For more information on how to trigger CSS animation on a scroll, you can check my other post.
I have created an experiment to measure the performance of CSS on actual DOM elements and pseudo-elements. Here are the results that might help you decide when to use these elements.
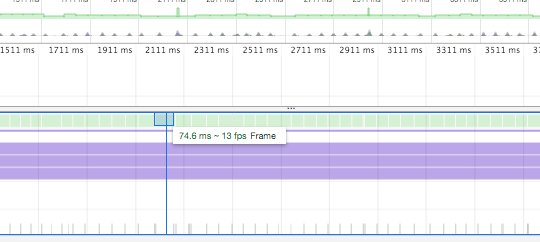
Using DIV:
I have used two div elements to apply looping animation. It was simple @keyframes animations and I measured the frame rate of the animation once it is clicked on. This was a simple animation but its duration is short, so it's a good experiment to measure the performance. Its frame rate reaches about 13FPS.

13FPS is considered as not so good as we're having devices capable of rendering 120 FPS without a problem.
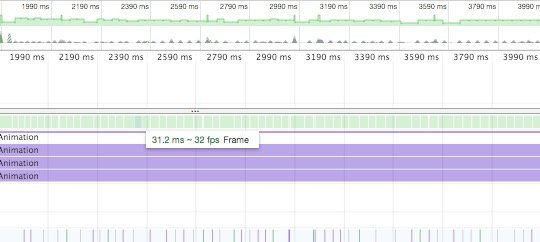
Using CSS before and after:
I have created a Flash Warning Demo using CSS before and after I applied the animation loop with opacity, background-position, and filter properties. I have just measured the frame rate that I was able to get with this method. It's averaging 31 FPS.

This is nothing groundbreaking, but it's actually performing two times faster than DOM elements.
What's the verdict here?
With Looping Animation We get about twice as good frame rates using CSS before and after. That means your animations and transitions will become more smooth while using pseudo-elements. (Most of the times)
What is the Difference between CSS before and after
::before works like a ::first-child of the element. so I'ts properties will behave like a first child. this includes depth or z-index.
::after works like a :last-child of the element and will have the higher depth or z-index then ::before until overridden.
But technically there is no difference between them as they both have the same implementation. They both create Stacking Context when defined in CSS.
Final Words
Using CSS before and after will give you two additional elements to experiment with, While used correctly, can be extremely useful for various reasons. For me, I created a chrome ad-on to highlight links. and I was able to do so much just using these pseudo-elements as I didn't modify any HTML content. For ant Developer or Designer, This simple hack can do so much without touching any DOM element.
On the other hand, avoiding these elements won't hurt your design, as these are used mostly for decorations.